
Understanding Lip Anatomy to Reduce Lip Filler Migration Risks
Do you know how to minimise the risk of lip filler migration? Are you aware of how understanding lip anatomy can help you to reduce this risk?
If you’re a medical aesthetics practitioner and answered ‘no’ or weren’t sure about either of those questions, this article is for you.
Our Academic Director, the respected anatomist and researcher, Professor Sebastian Cotofana has conducted studies into exactly this. In fact, he led a team of international experts which established the existence of lip compartments for the first time in 2023.
Here we explain what all aesthetic practitioners should understand when it comes to:
- Lip anatomy
- How to minimise the risk of lip filler migration
- Lip filler injection techniques.
Lip anatomy: The 12 compartments of the lip
As we mentioned, Professor Cotofana and his team confirmed the existence of lip compartments. This research, entitled Intralabial Lip Compartments and Their Potential Clinical Relevance was published in Plastic & Reconstructive Surgery.
Research into lip compartments
Professor Cotofana’s team included aesthetic medicine experts from around the world, including Dr Wei-Jin Hong, cosmetic nurse Julie Horne, Dr Steven Harris and Dr Konstantin Frank.
They conducted a fresh frozen cadaveric study featuring 20 human donors who were each given dye injections simulating lip filler treatments. Diversity within the study was important with both male and female patients, caucasian, Asian and Black donors being represented.
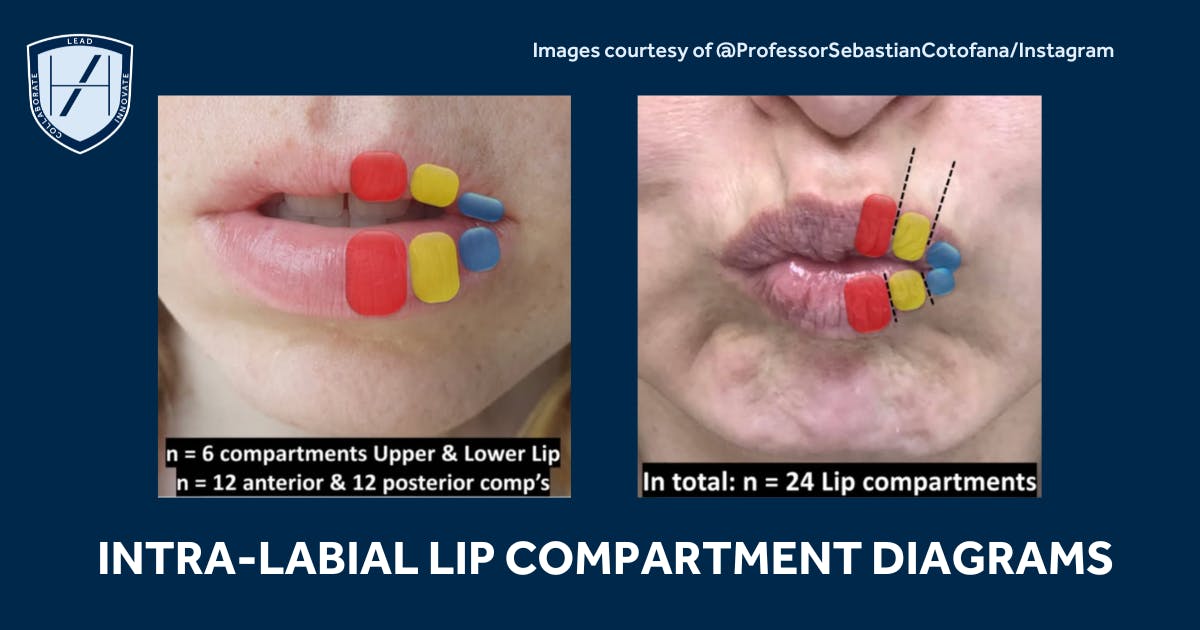
24 lip compartments in total, 12 per lip
The team’s findings discovered the following key points about lip compartments:
- There are 12 compartments in each lip, so 24 in total
- Lip compartments are divided equally between the upper and lower lip
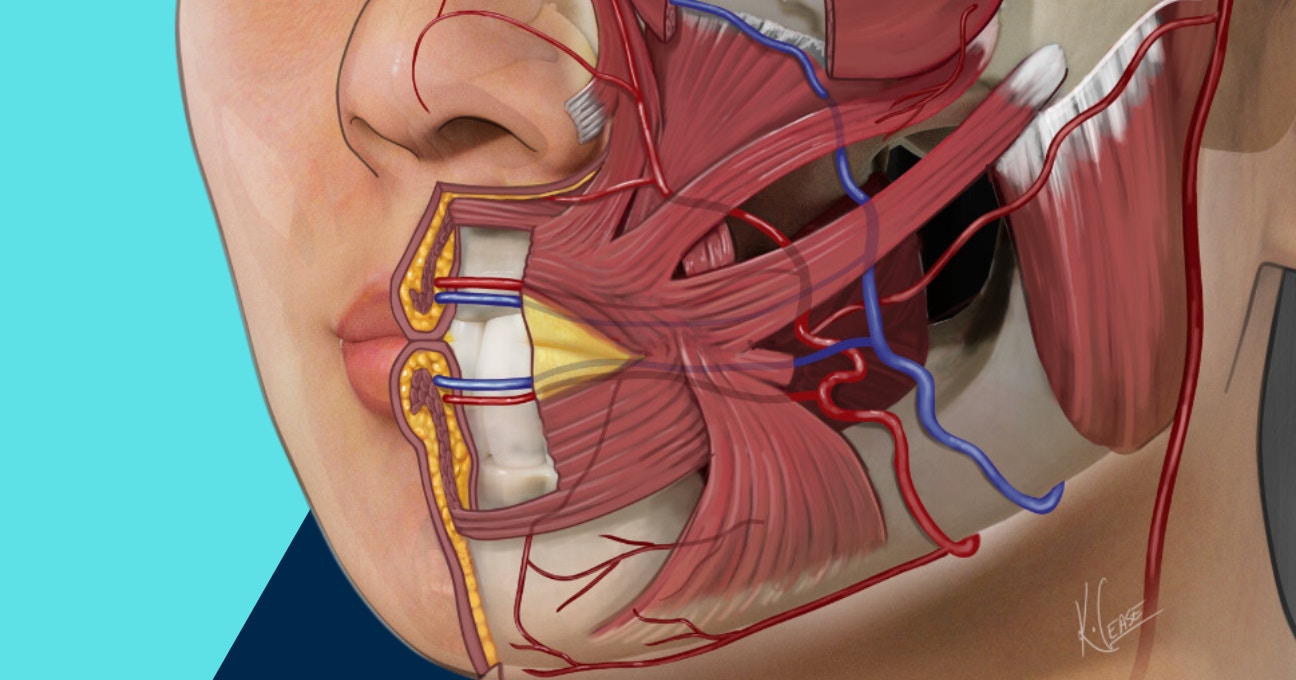
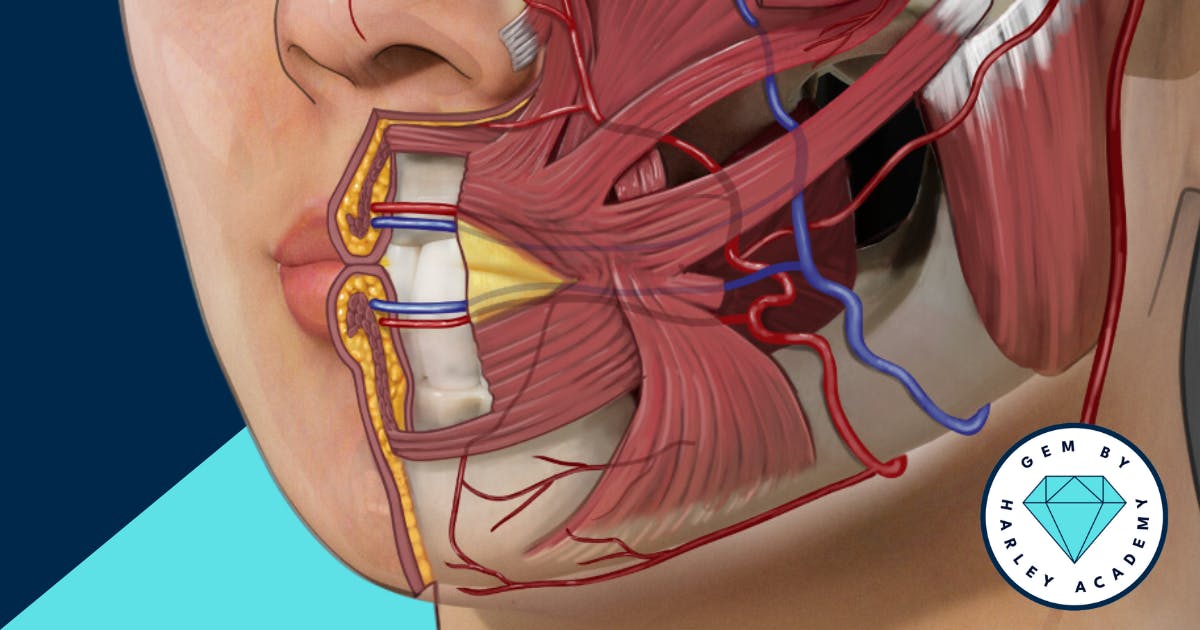
- There are 6 anterior and 6 posterior compartments in each lip with the anterior and posterior compartments being divided by the obicularis oris muscle.
- Every lip compartment is separated by a vertical septation, or ‘wall’
- Compartment boundaries are consistently found in the same locations across individuals
- These findings remained true regardless of sex or race
- The size and volume of each compartment contribute to overall lip shape and appearance.
‘The anterior compartments had volumes ranging from 0.30 to 0.39 cc; the posterior compartment volume ranged from 0.44 to 0.52 cc. The compartment volumes were larger centrally and decreased gradually toward the oral commissure,’ the team explains.
Professor Cotofana said of the four-year research project: “The study revealed that a total of 24 compartments are present - 12 anterior and 12 posterior compartments, separated by the orbicularis oris muscle - of which 6 are located anteriorly in the upper and 6 anteriorly in the lower lip. These compartments are separated by the midline and decrease in size the closer they are to the corner of the mouth. This potentially explains the highly variable shape of lips and why mature lips invert majorly laterally and appear deflated.”
His team concluded, ‘To achieve a natural lip shape preserving aesthetic outcome it may be preferable to administer the volumising product using a compartment-respecting injection approach.’
Relevance of the lip compartments to lip filler approaches
We always advocate for a solid understanding of facial anatomy to improve your clinical practice. Whilst a basic knowledge of lip anatomy will give you a decent grounding to work from, keeping up-to-date with the latest findings is how you’ll excel.
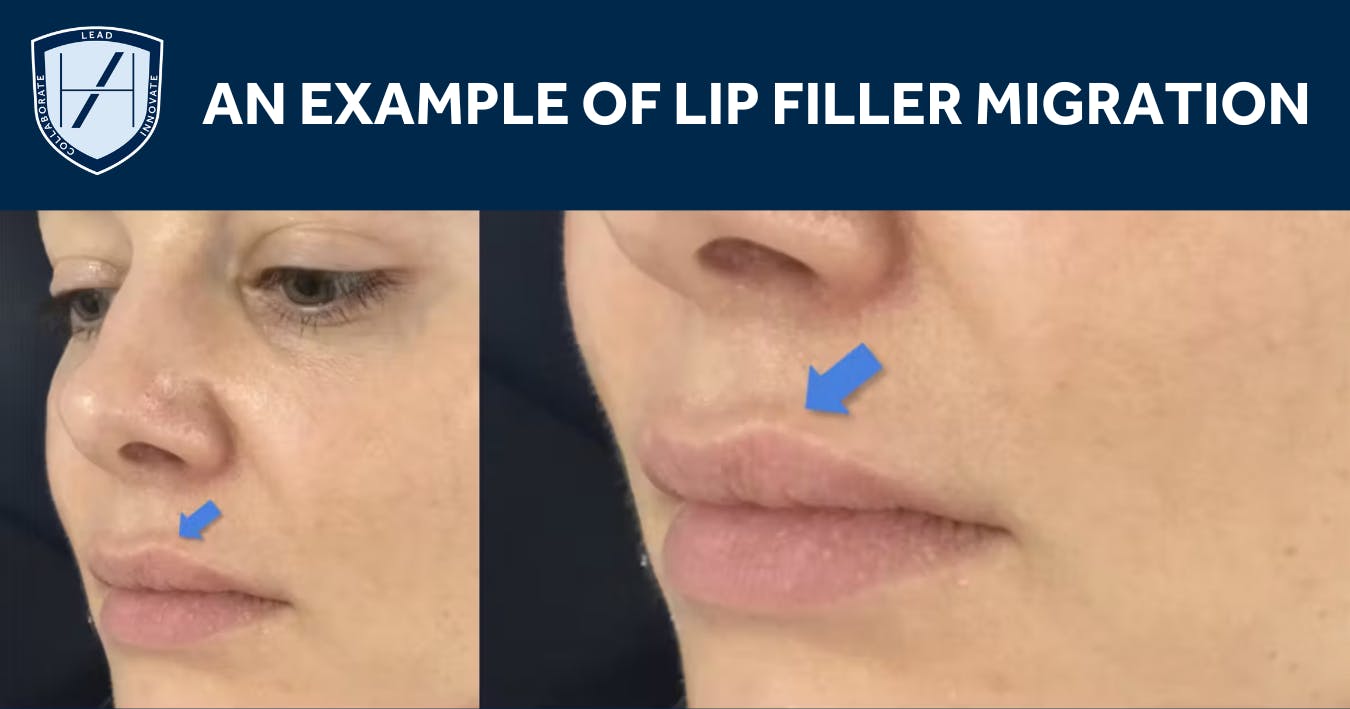
Knowledge of the relevant facial anatomy allows you to inject lip filler within the natural boundaries of each compartment. Proper filler placement can minimise the risk of the gel spreading beyond the intended area and causing an unnatural or ‘migrated’ appearance.
Respecting these natural divisions will enhance your lip filler outcomes. They provide an innate framework for treating the lips.
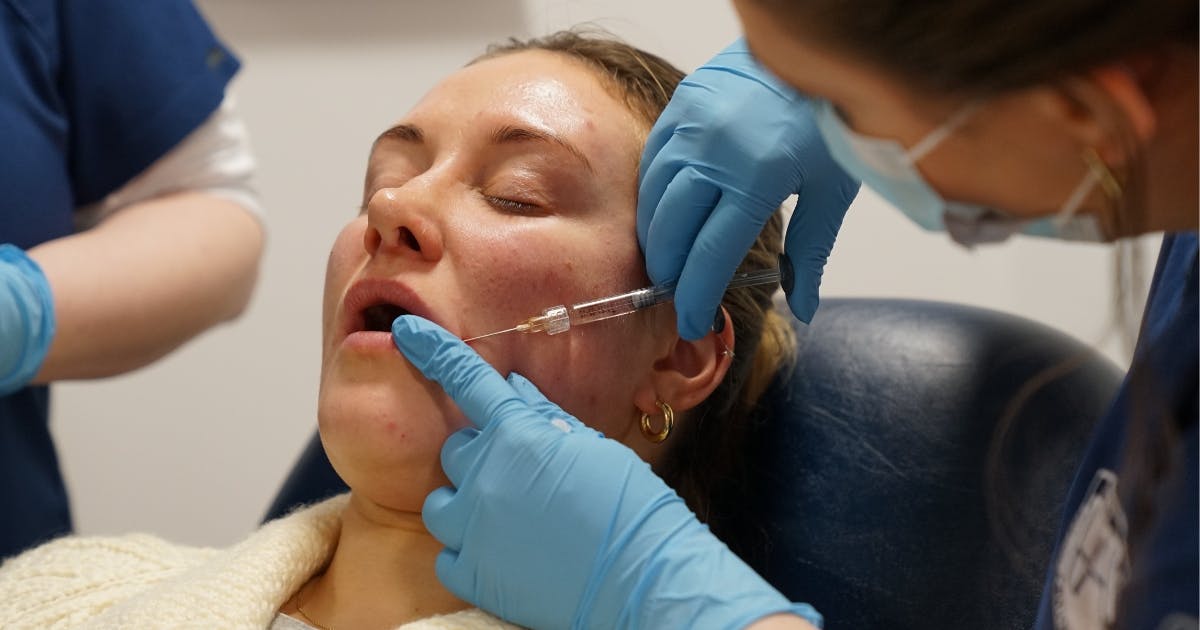
Creating microchannels in the lip tissue
Every time you inject, you create a microchannel in the tissue along the path of your needle or cannula. These may provide a route for filler displacement along the needle track.
You have to strike a balance with product choice for hyaluronic acid gels in the lips. On one hand, you want a product that’s going to look and feel natural in a mobile and animated lip. While on the other, you need a product that isn’t so thin that it’ll be easily displaced by surrounding muscle contractions.
Though high GPrime fillers are more likely to be highly cohesive and less likely to displace, they may not look natural in lip tissue. As such, opting for a medium GPrime product or a softer but more cohesive product is a good option.
Regardless of the product you choose, if there are lots of microchannels between compartments there’ll always be a degree of product flow and displacement between them.
You can minimise this further by reducing the number of microchannels created by minimising the number of times you traverse the septations with your needle or cannula.
So what are the best lip filler injection techniques to reduce the risk of migration? Let us explain…
Best lip filler injection techniques to minimise migration risks
Aspects to consider when honing your lip filler techniques include:
- Choosing the most appropriate tool
- Selecting the right filler product
- Using evidence-based injection techniques based on your experience level
- Properly placing filler at the correct depth.
We outline the most up-to-date, evidence-based lip filler techniques in the Lips & Perioral section of the Global Evidence Matrix (GEM).
Cannula, needle or both?
In GEM there are four main ways that we, as medical aesthetics practitioners, can inject the lip body:
1. Horizontal threads with a needle
2. Vertical threads with a needle
3. Boluses with a needle
4. Fanning with a cannula.
When done well, with the correct choice of filler, there should be minimal product displacement. That being said, with both horizontal threads using a needle and fanning technique with a cannula you’re traversing the septations and creating microchannels.
With the needle, if you’re doing multiple threads, you may create lots of microchannels. With a cannula, you’re likely to do fewer passes and create fewer channels. However, each of these channels is likely to be wider if your cannula has a larger gauge than your needle.
The goal in this case - regardless of whether you’re using a needle or a cannula - is to reduce the number of passes you make through the septations. When you’re using a cannula you’ll often feel this resistance as you pass through.
Try to avoid making any microchannels between the anterior compartments by administering vertical threads from within the vermillion border. Alternatively, you can use microboluses directly into the compartment that you’re targeting.
Choosing the right lip injection technique
So how do you know which method to use for your lip filler treatments? The technique you choose may depend on what you’re trying to achieve.
- If you’re looking for anterior projection of the lips then horizontal threads may be beneficial
- For lip height, vertical threads are more likely to give you good results
- Using a cannula to replace volume in more mature lips will diffusely add volume to the lip body
- For patients who already have their ideal lip shape, where you want to subtly enhance their tubercles, small boluses directly targeting those compartments can work well.
This being said, one of the most important things is choosing an evidence-based treatment that you feel confident putting into practice and that matches your competency level. If you’re a beginner - a Stage 1 injector - your focus will be on needle techniques rather than cannula.
Threading and bolus/microbolus techniques are taught on all Harley Academy filler courses as they’re suitable for novices onwards.
Cannula fanning is for intermediate, Stage 2 injectors. This is explained on our Level 7 Diploma in Cosmetic Injectables and our Perioral & Lip Filler Masterclass.
Learning to master lip filler techniques
Mastering lip filler takes time - it’s a complex treatment that offers room for progression. As such, start with the basic techniques and become confident with them before expanding your repertoire.
We’ve discussed how to add volume to the body of the lip as well as the benefits of each technique. In select patients, we may also want to treat other targets in the perioral area:
- Vermillion border with a needle
- Perioral lines with a cannula
- The perioral lines with a needle
- Philtral columns with a needle.
Developing your innate analytical facial assessment and treatment planning skills, as well as your toolkit of techniques is a step-by-step process. This is something Harley Academy supports its trainees with through multi-stage aesthetics training options.
Additionally, as an asset for injectors of all levels, GEM by Harley Academy and its online platform provide stage-by-stage guidance. Understanding which treatments and injection techniques are suited to your experience level allows you to plot out your developmental goals.
When it comes to lip filler treatments, these all sit within the Stage 1 and Stage 2 categories.
At Harley Academy, we teach GEM Stage 1 lip injection techniques to all our trainees in our Foundation Training in Medical Aesthetics and Aesthetics Accelerator courses.
Clinicians taking our Level 7 Diploma in Cosmetic Injectables may progress onto our Stage 2 approaches. This applies to our Level 7+ combined programme, too, and covers both observed cases and practical one-to-one mentoring sessions. Outside of training sessions, Level 7 trainees can also access the full range of lip filler technique information via the GEM app.
Those attending our Perioral & Lip Filler Masterclass will fuse Stage 1 and Stage 2 methodologies.
Other things injectors can do to get great lip filler results
Depth control
In GEM we talk a lot about depth control. We know that if you’re too superficial you’re likely to get filler lumps. Going too deep can also be a problem as the superior and inferior labial arteries usually run deep to the orbicularis oris. Therefore, injecting here can lead to an increased risk of significant bruising and vascular adverse events.
Where not to inject lip filler
It's also important to focus on where NOT to inject.
We sometimes see new aesthetic practitioners injecting too close to the wet-dry border. This can mean filler may sometimes displace into the wet mucosa.
The other border we want to avoid crossing is the vermillion border; we would never advocate for injecting through the vermillion border at Harley Academy.

Risk mitigation whilst delivering outstanding results
Understandably, most aesthetic practitioners want to use the best, most safety-conscious approaches. This is something you can proudly communicate to existing and potential patients to highlight your credentials and make them feel at ease.
When choosing your aesthetics training course, consider which pathway will provide the most in-depth, current education to inform your practice.
Learn to practice at the cutting edge of aesthetics
Harley Academy teaches in line with GEM principles. This innovative framework provides all the information aesthetic practitioners need to carry out filler treatments using current evidence-based methodologies, based on experience level. Furthermore, GEM is reviewed annually to ensure it’s always up-to-date and you’re practising at the cutting edge of medical aesthetics.
In addition to being taught on our aesthetics courses, the GEM app is available on a subscription basis. This digital platform hosts a wealth of information, from at-a-glance matrices for each treatment area, explaining the techniques, tools and product types to use, to more detailed explorations and high-definition demonstration videos.
The GEM app and filler complications prevention
A 12-month subscription to the GEM app is included free of charge with all our Level 7 botox and filler courses. This applies to the Level 7 Diploma in Cosmetic Injectables, the combined Level 7+ and the Fast Track Level 7.
By using GEM injection techniques, both you and your patients can be reassured that you’re:
- Employing evidence-based techniques
- Using up-to-date facial anatomy knowledge
- Understanding the best tools and products for each treatment
- Practising within your scope of competency according to your experience level
- Delivering the safest possible treatment based on the latest scientific data.
This approach allows you to minimise the risk of complications in every scenario as a matter of course.
Additional information on this can be found in our online course, Preventing and Managing Filler Complications. This is available for purchase as a short standalone course but is also included free of charge in our Level 7 and Aesthetics Accelerator courses.
Ethical, evidenced aesthetics training for medical professionals
If you’re an aesthetic practitioner looking to specialise in lip filler treatments, or a healthcare professional looking for the best aesthetics training to start your new career, we can help.
We offer a number of resources tailored to delivering you the support you need when making decisions about your career.
1. Attend our free online event, How to Get Started in Aesthetics
For just an hour of your time, we’ll deliver an exploration of aesthetic medicine and where the opportunities lie within this new medical specialty. Our experts will share their journeys from the NHS to private practice as full-time aesthetics specialists. They’ll tell you about the pearls, the pitfalls and the different pathways for both careers and training in aesthetic medicine. You can also ask any questions you may have in a live Q&A session so you’ll leave feeling informed, inspired and in a place to make a decision about next steps. Click on the heading above for more information.
2. Take our online Course Matchmaker quiz
Not sure which aesthetics course is right for you? We’ve designed a quiz to help steer you to the training programmes best-suited to your criteria. This takes in a number of factors, from your career goals and how long you have to dedicate to a course, to price and how much hands-on training you’re looking for. Simply click on the heading above to take the quiz and your recommended aesthetics course matches will be revealed!
3. Get personalised advice direct from our Courses Team
If you just want to talk to someone who can give you all the information you need and answer any questions, we understand. Book a call with our friendly and knowledgeable Course Advisors for a day and time that suits you and they’ll phone you then. If you click on the heading above it'll take you straight to their diary.
All information correct at time of publication
Download our full prospectus
Browse all our injectables, dermal fillers and cosmetic dermatology courses in one document
By submitting this form, you agree to receive marketing about our products, events, promotions and exclusive content. Consent is not a condition of purchase, and no purchase is necessary. Message frequency varies. View our Privacy Policy and Terms & Conditions
Attend our FREE open evening
If you're not sure which course is right for you, let us help
Join us online or in-person at our free open evening to learn more
Our Partners


STAY INFORMED
Sign up to receive industry news, careers advice, special offers and information on Harley Academy courses and services